Components ETL pipeline tutorial
dg and Dagster Components are under active development. You may encounter feature gaps, and the APIs may change. To report issues or give feedback, please join the #dg-components channel in the Dagster Community Slack.
Setup
1. Install duckdb and tree
First, install duckdb for a local database and tree to visualize project structure:
- Mac
- Windows
- Linux
tree is optional and is only used to produce a nicely formatted representation of the project structure on the comand line. You can also use find, ls, dir, or any other directory listing command.
2. Install create-dagster
The create-dagster CLI allows you to quickly create a components-ready Dagster project. We recommend using uv, which allows you to run uvx create-dagster without a separate installation step. If you're not using uv, follow the create-dagster installation steps to install the create-dagster command line tool.
3. Create a new Dagster project
After installing dependencies, create a components-ready Dagster project. The steps for creating a project will depend on your package manager/environment management strategy.
- uv
- pip
First, run the command below, and respond yes to the prompt to run uv sync after scaffolding:
uvx create-dagster project jaffle-platform
Next, enter the directory and activate the virtual environment:
cd jaffle-platform && source .venv/bin/activate
Running uv sync after creating a Dagster project creates a virtual environment and installs the dependencies listed in pyproject.toml, along with jaffle-platform itself as an editable install.
First initialize and activate a virtual environment:
mkdir jaffle-platform && cd jaffle-platform
python -m venv .venv
source .venv/bin/activate
Next, run create-dagster project . to create a new Dagster project in the current directory:
create-dagster project .
Finally, install the newly created project package into the virtual environment as an editable install:
pip install -e .
To learn more about the files, directories, and default settings in a project created with create-dagster project, see "Creating a project with components".
Ingest data
1. Add the Sling component type to your environment
To ingest data, you will need to set up Sling. To make the Sling component available in your environment, install the dagster-sling package:
- uv
- pip
uv add dagster-sling
pip install dagster-sling
2. Confirm availability of the Sling component type
To confirm that the dagster_sling.SlingReplicationCollectionComponent component type is now available, run the dg list components command:
dg list components
┏━━━━━━━━━━━━━━━━━━━━━━━━━━━━━━━━━━━━━━━━━━━━━━━━━━━┳━━━━━━━━━━━━━━━━━━━━━━━━━━━━━━━━━━━━━━━━━━━━━━━━━━━━━━━━━━━━━━━━━━┓
┃ Key ┃ Summary ┃
┡━━━━━━━━━━━━━━━━━━━━━━━━━━━━━━━━━━━━━━━━━━━━━━━━━━━╇━━━━━━━━━━━━━━━━━━━━━━━━━━━━━━━━━━━━━━━━━━━━━━━━━━━━━━━━━━━━━━━━━━┩
│ dagster.DefinitionsComponent │ An arbitrary set of dagster definitions. │
├────────────��───────────────────────────────────────┼──────────────────────────────────────────────────────────────────┤
│ dagster.DefsFolderComponent │ A folder which may contain multiple submodules, each │
│ │ which define components. │
├───────────────────────────────────────────────────┼──────────────────────────────────────────────────────────────────┤
│ dagster.PipesSubprocessScriptCollectionComponent │ Assets that wrap Python scripts executed with Dagster's │
│ │ PipesSubprocessClient. │
├───────────────────────────────────────────────────┼──────────────────────────────────────────────────────────────────┤
│ dagster_sling.SlingReplicationCollectionComponent │ Expose one or more Sling replications to Dagster as assets. │
└───────────────────────────────────────────────────┴──────────────────────────────────────────────────────────────────┘
3. Create a new instance of the Sling component
Next, create a new instance of the Sling component type:
dg scaffold defs 'dagster_sling.SlingReplicationCollectionComponent' ingest_files
This adds a Sling component instance called ingest_files to the src/jaffle_platform/defs directory of your project:
tree src/jaffle_platform
src/jaffle_platform
├── __init__.py
└── defs
    ├── __init__.py
    └── ingest_files
        ├── defs.yaml
        └── replication.yaml

3 directories, 4 files
A single file, defs.yaml, was created in the ingest_files directory. Every Dagster component has a defs.yaml file that specifies the component type and any parameters used to scaffold definitions from the component at runtime:
type: dagster_sling.SlingReplicationCollectionComponent

attributes:
  replications:
    - path: replication.yaml
Currently, the parameters in your Sling component defs.yaml define a single replication, which is a Sling term that specifies how data should be replicated from a source to a target. The replication details are specified in a replication.yaml file that is read by Sling. You will create this file shortly.
The path parameter for a replication is relative to the directory that contains defs.yaml. This is a convention for components.
4. Download files for Sling source
Next, you will need to download some files locally to use your Sling source, since Sling doesn't support reading from the public internet:
curl -O https://raw.githubusercontent.com/dbt-labs/jaffle-shop-classic/refs/heads/main/seeds/raw_customers.csv &&
curl -O https://raw.githubusercontent.com/dbt-labs/jaffle-shop-classic/refs/heads/main/seeds/raw_orders.csv &&
curl -O https://raw.githubusercontent.com/dbt-labs/jaffle-shop-classic/refs/heads/main/seeds/raw_payments.csv
5. Set up the Sling to DuckDB replication
Once you have downloaded your Sling source files, update the replication.yaml file to reference them:
source: LOCAL
target: DUCKDB

defaults:
  mode: full-refresh
  object: "{stream_table}"

streams:
  file://raw_customers.csv:
    object: "main.raw_customers"
  file://raw_orders.csv:
    object: "main.raw_orders"
  file://raw_payments.csv:
    object: "main.raw_payments"
Next, modify the defs.yaml file to tell the Sling component where replicated data with the DUCKDB target should be written:
type: dagster_sling.SlingReplicationCollectionComponent

attributes:
  sling:
    connections:
      - name: DUCKDB
        type: duckdb
        instance: /tmp/jaffle_platform.duckdb
  replications:
    - path: replication.yaml
6. View and materialize assets in the Dagster UI
To see what you've built so far, you can load your project in the Dagster UI:
dg dev
To materialize assets and load tables in the DuckDB instance, click Materialize All:
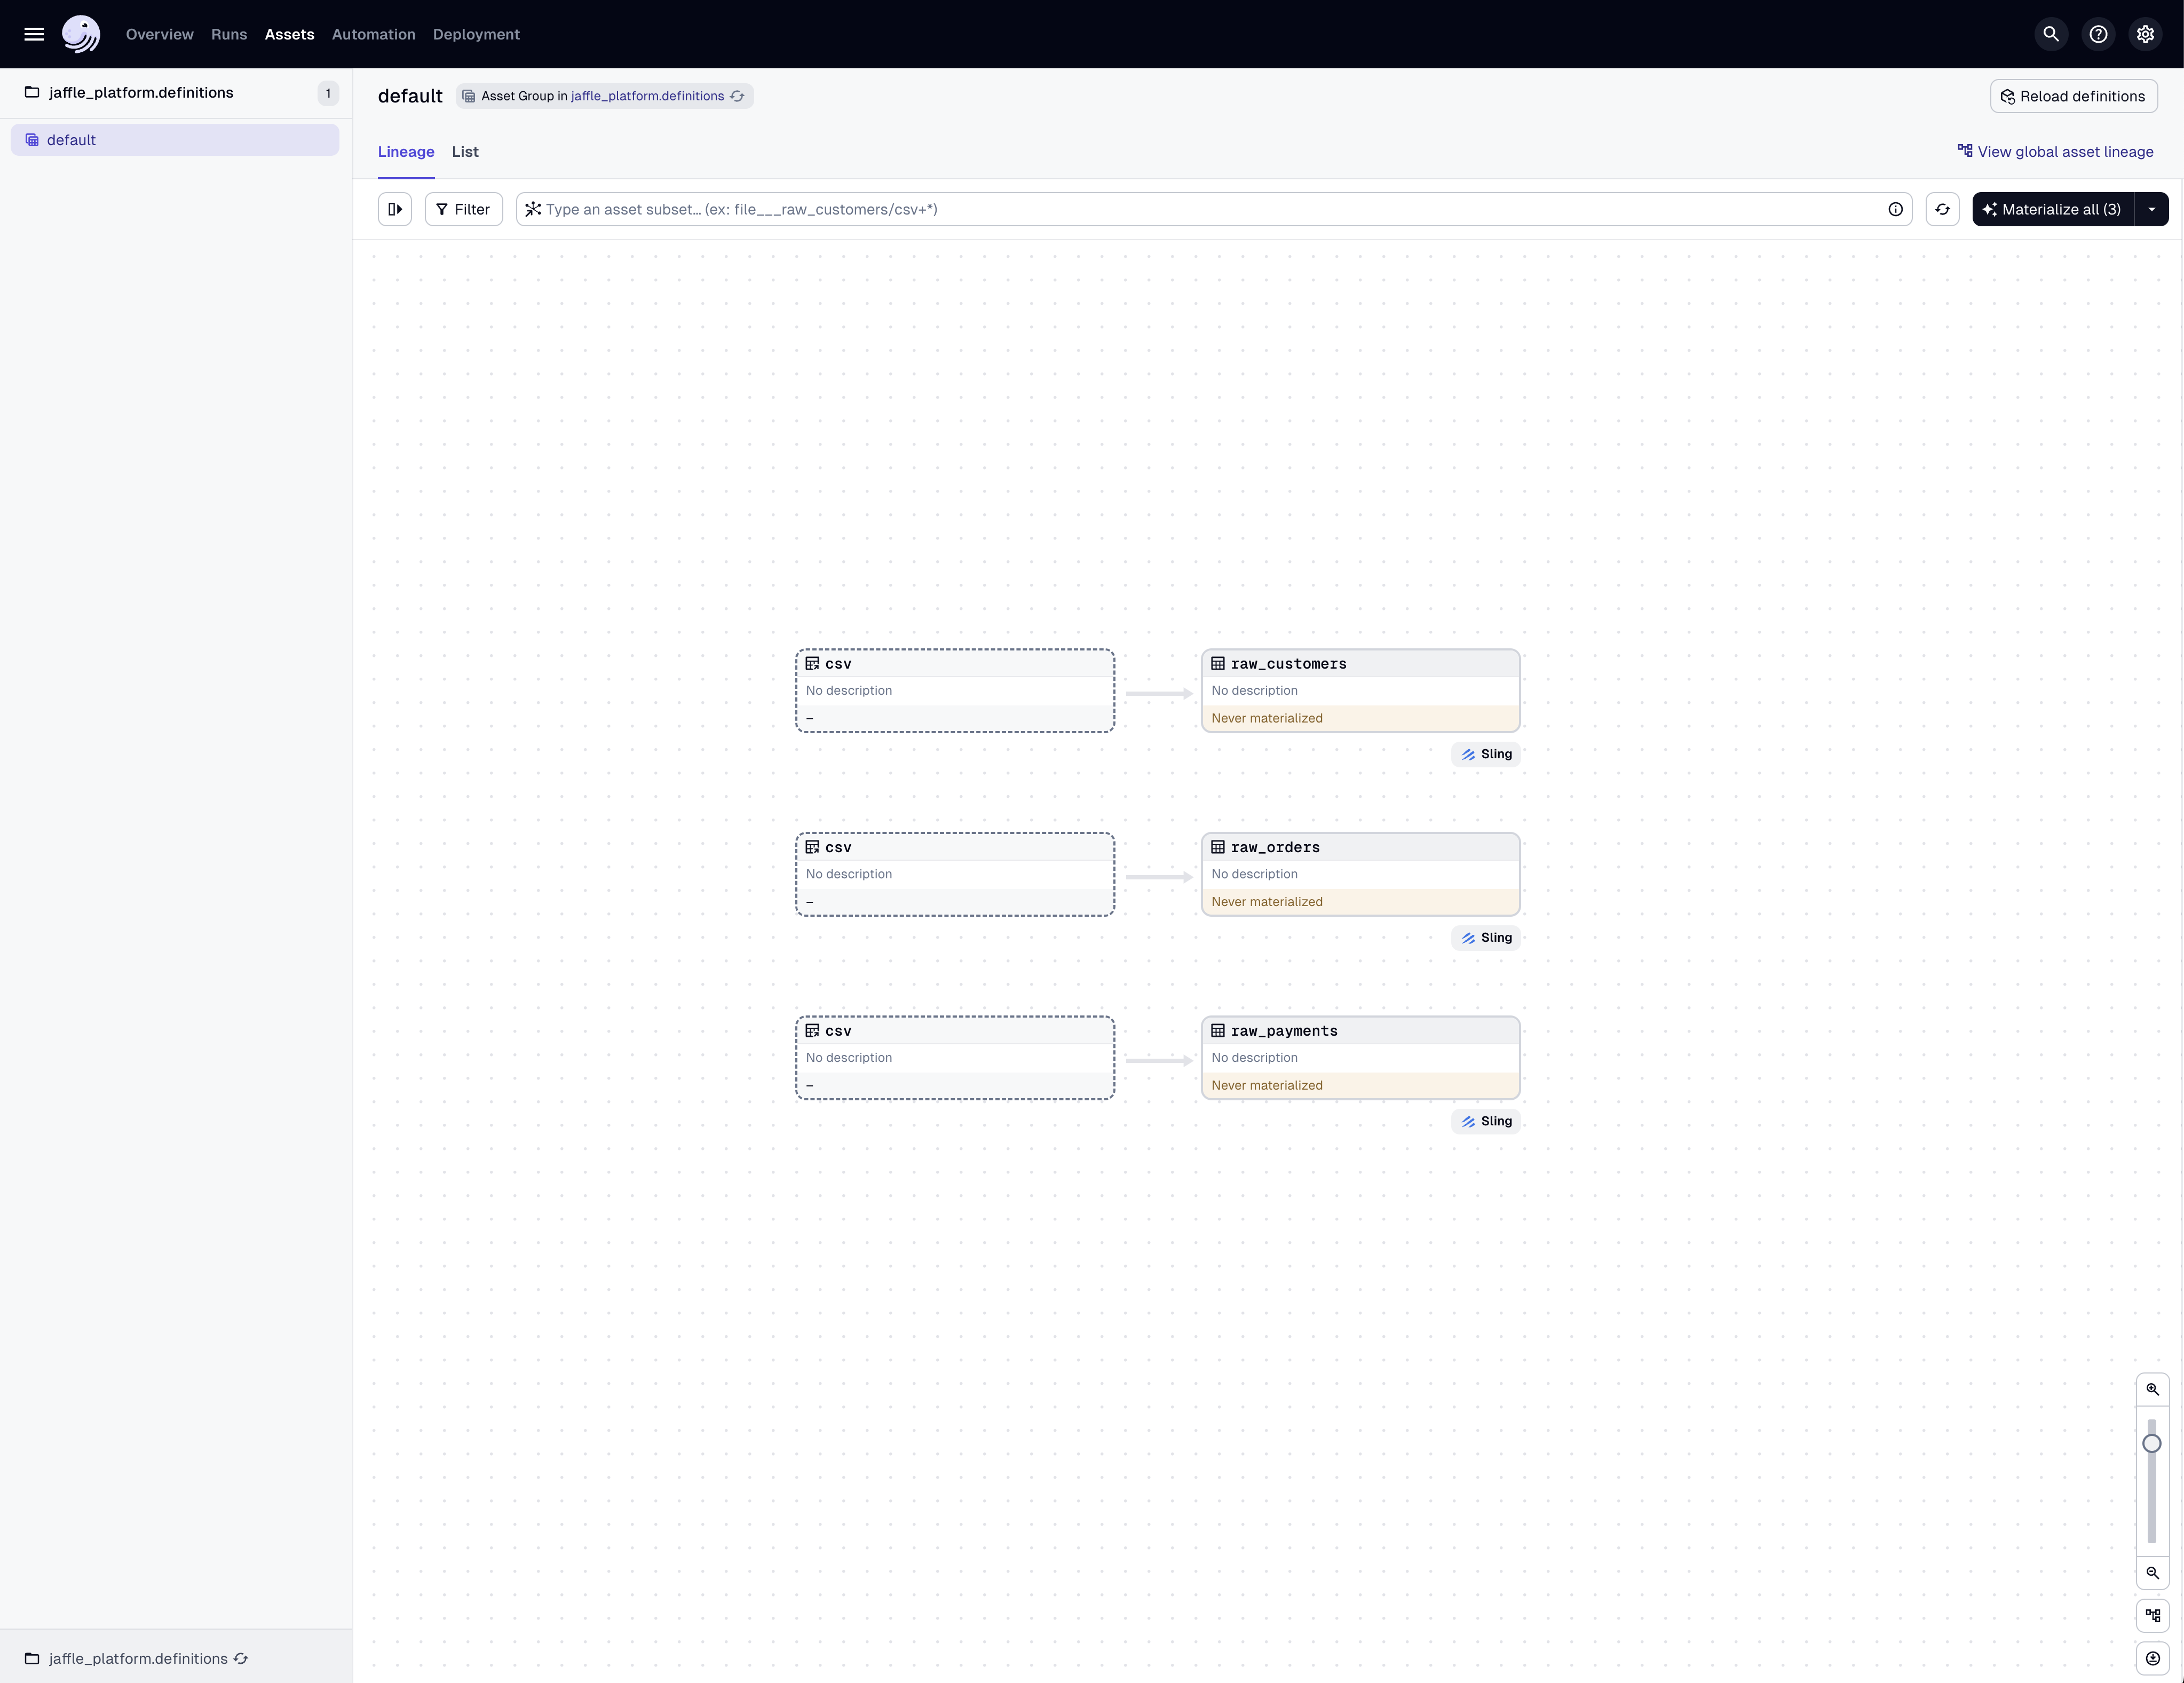
7. Verify the DuckDB tables
To verify the DuckDB tables were correctly populated, run the following command:
duckdb /tmp/jaffle_platform.duckdb -c "SELECT * FROM raw_customers LIMIT 5;"
┌───────┬────────────┬───────────┬──────────────────┐
│ id │ first_name │ last_name │ _sling_loaded_at │
│ int32 │ varchar │ varchar │ int32 │
├───────┼────────────┼───────────┼──────────────────┤
│ 1 │ Michael │ P. │ ... |
│ 2 │ Shawn │ M. │ ... |
�│ 3 │ Kathleen │ P. │ ... |
│ 4 │ Jimmy │ C. │ ... |
│ 5 │ Katherine │ R. │ ... |
└───────┴────────────┴───────────┴──────────────────┘
Transform data
To transform the data you downloaded in the previous section, you will need to download a sample dbt project from GitHub and use the data ingested with Sling as an input for the dbt project.
1. Clone the sample dbt project from GitHub
First, clone the sample dbt project and delete the embedded git repository:
git clone --depth=1 https://github.com/dagster-io/jaffle-platform.git dbt && rm -rf dbt/.git
In this tutorial, we have you clone the dbt project into your Dagster project. However, you can clone the dbt project anywhere as long as you set the relative path to the dbt project correctly in the dbt project defs.yaml.
2. Install the dbt project component type
To interface with the dbt project, you will need to instantiate a Dagster dbt project component. To make the dbt project component type available, install the dbt integrations dagster-dbt and dbt-duckdb:
- uv
- pip
uv add dagster-dbt dbt-duckdb
pip install dagster-dbt dbt-duckdb
Confirm that the dagster_dbt.DbtProjectComponent component type is available by running dg list components:
dg list components
┏━━━━━━━━━━━━━━━━━━━━━━━━━━━━━━━━━━━━━━━━━━━━━━━━━━━┳━━━━━━━━━━━━━━━━━━━━━━━━━━━━━━━━━━━━━━━━━━━━━━━━━━━━━━━━━━━━━━━━━━┓
┃ Key ┃ Summary ┃
┡━━━━━━━━━━━━━━━━━━━━━━━━━━━━━━━━━━━━━━━━━━━━━━━━━━━╇━━━━�━━━━━━━━━━━━━━━━━━━━━━━━━━━━━━━━━━━━━━━━━━━━━━━━━━━━━━━━━━━━━━┩
│ dagster.DefinitionsComponent │ An arbitrary set of dagster definitions. │
├───────────────────────────────────────────────────┼──────────────────────────────────────────────────────────────────┤
│ dagster.DefsFolderComponent │ A folder which may contain multiple submodules, each │
│ │ which define components. │
├───────────────────────────────────────────────────┼──────────────────────────────────────────────────────────────────┤
│ dagster.PipesSubprocessScriptCollectionComponent │ Assets that wrap Python scripts executed with Dagster's │
│ │ PipesSubprocessClient. │
├───────────────────────────────────────────────────┼──────────────────────────────────────────────────────────────────┤
│ dagster_dbt.DbtProjectComponent │ Expose a DBT project to Dagster as a set of assets. │
├───────────────────────────────────────────────────┼──────────────────────────────────────────────────────────────────┤
│ dagster_sling.SlingReplicationCollectionComponent │ Expose one or more Sling replications to Dagster as assets. │
└───────────────────────────────────────────────────┴──────────────────────────────────────────────────────────────────┘
3. Scaffold a new instance of the dbt project component
Next, scaffold a new instance of the dagster_dbt.DbtProjectComponent component, providing the path to the dbt project you cloned earlier as the project_path scaffold parameter:
dg scaffold defs dagster_dbt.DbtProjectComponent jdbt --project-path dbt/jdbt
This creates a new dbt project component instance at jaffle_platform/defs/jdbt. To see the component configuration, open defs.yaml in that directory:
type: dagster_dbt.DbtProjectComponent

attributes:
  project: '{{ project_root }}/dbt/jdbt'
4. Update the dbt project component configuration
To see the new dbt assets in the Dagster UI, run dg dev:
dg dev
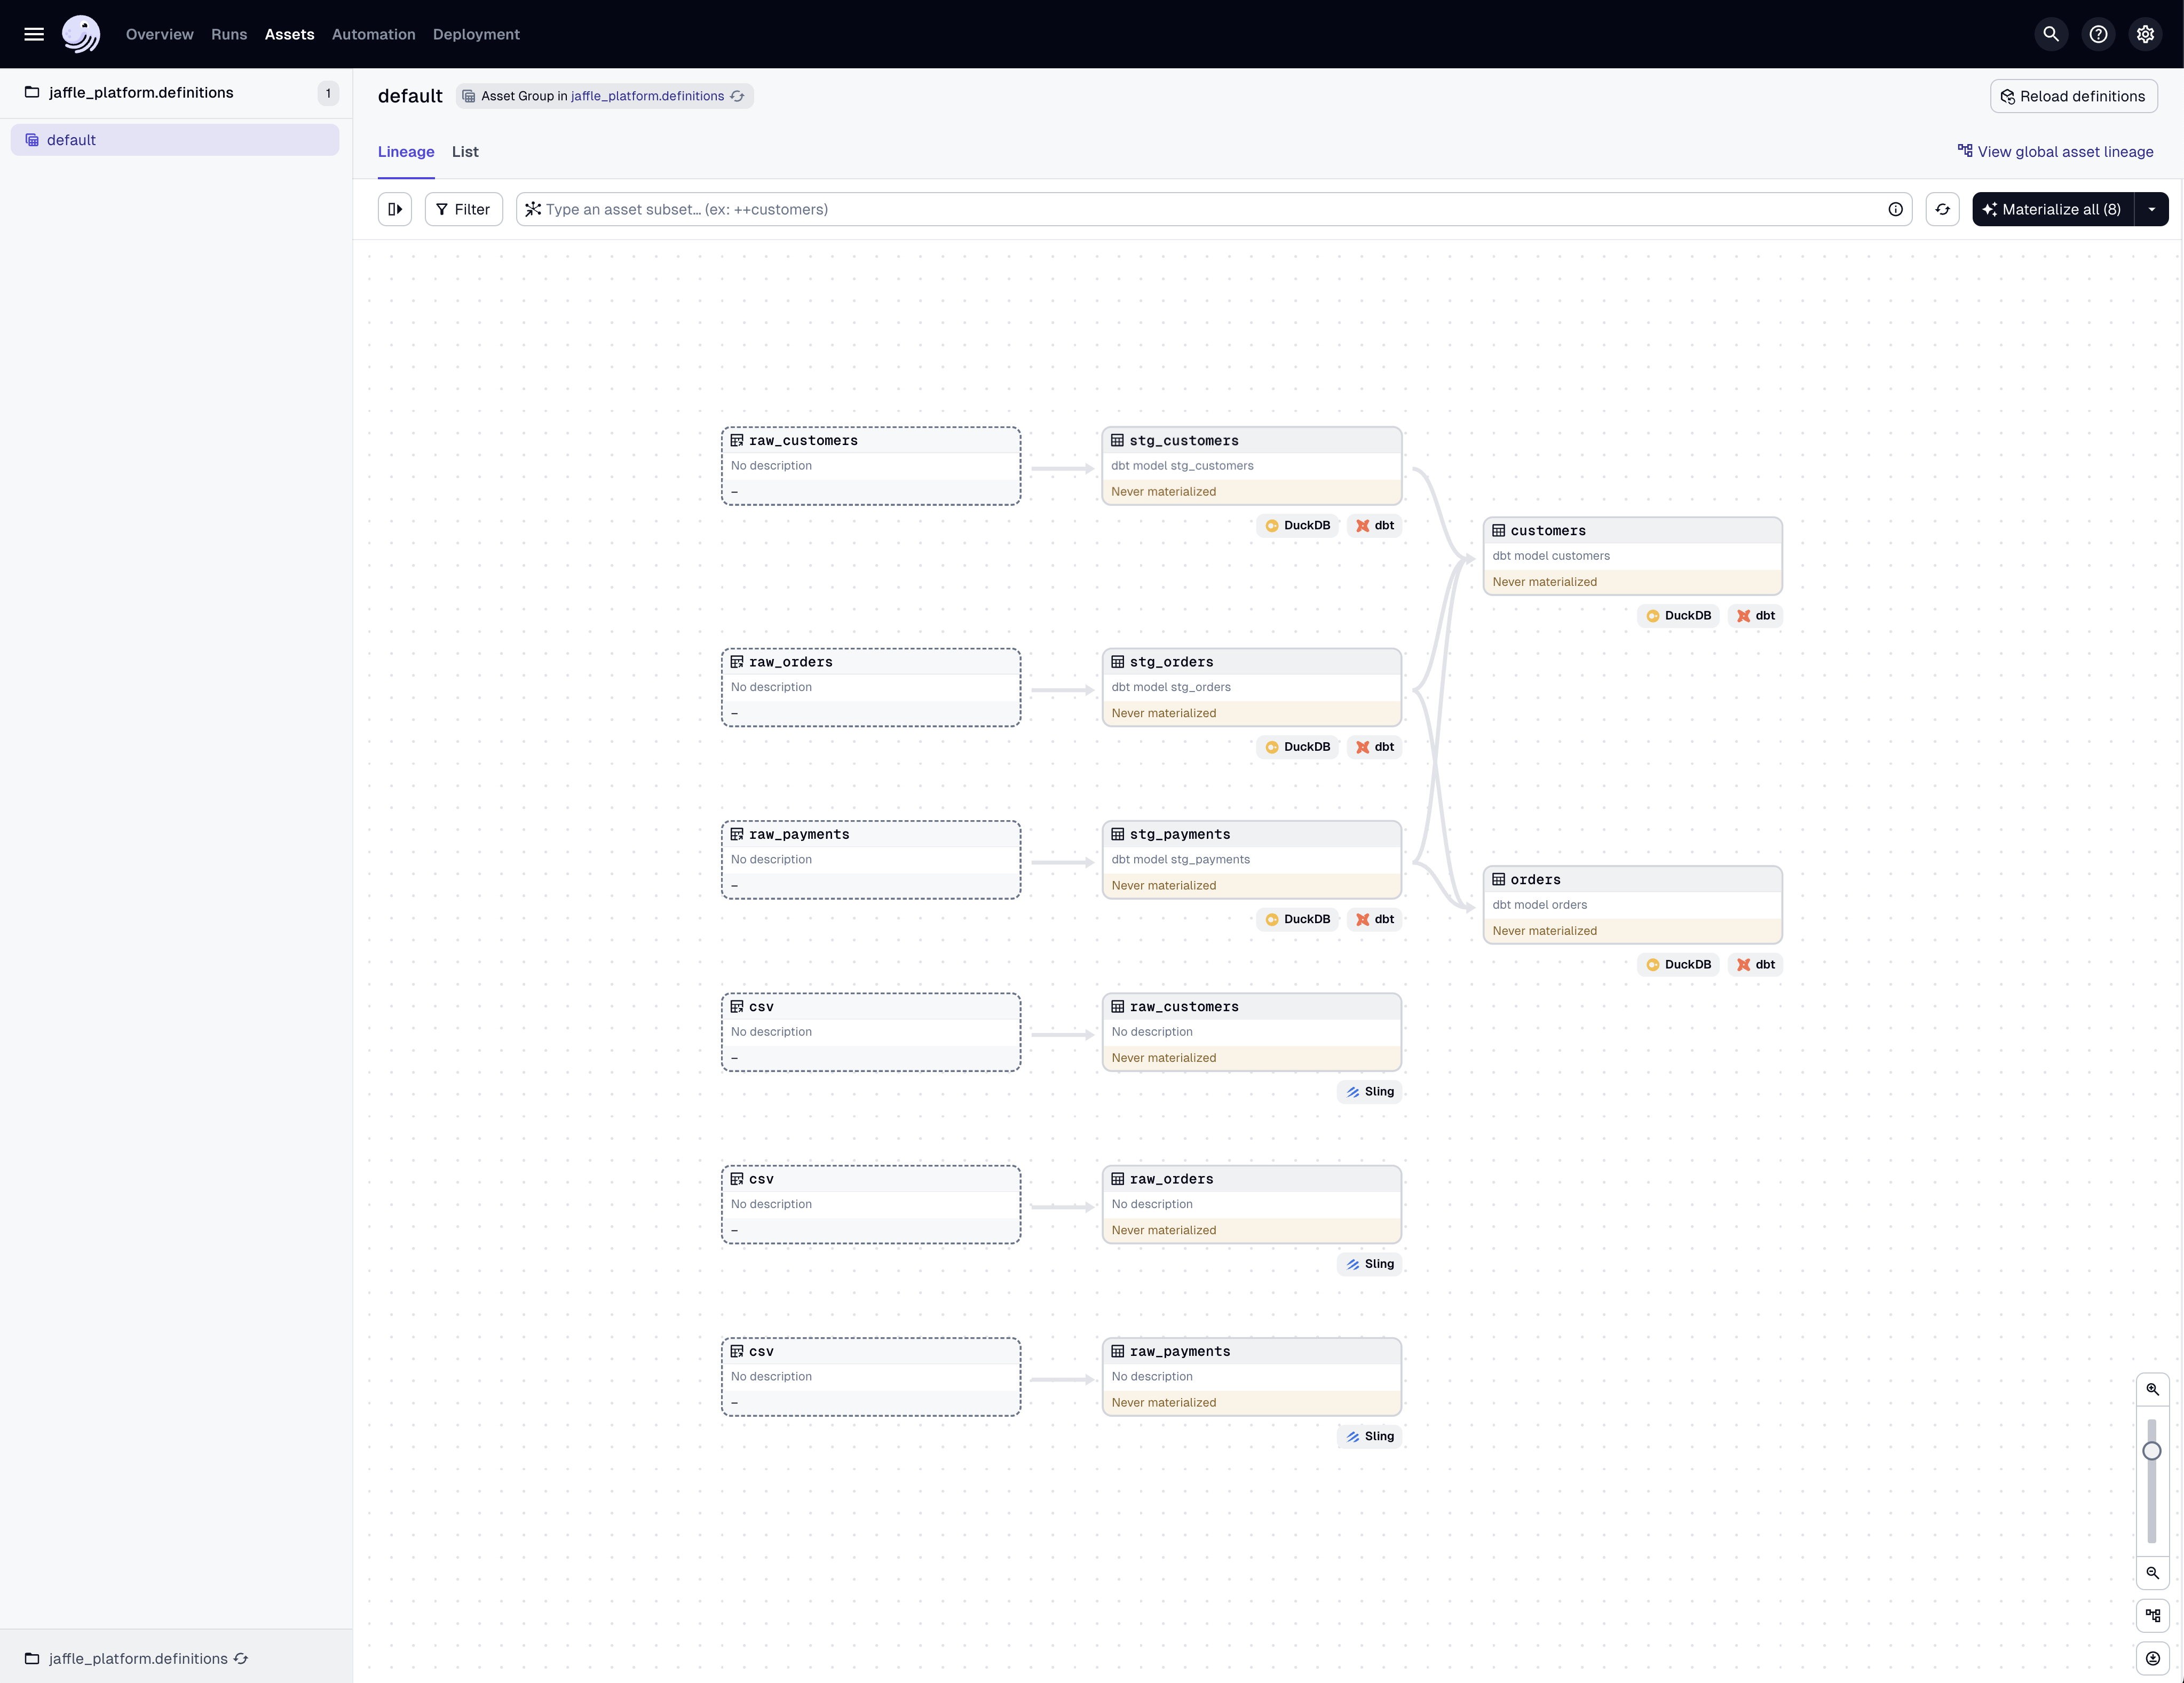
You can see that there appear to be two copies of the raw_customers, raw_orders, and raw_payments tables. If you click on the new assets, you will see that the asset keys generated by the dbt project component contain main/*, whereas the keys generated by the Sling component contain target/main/*.
To fix this, you will need to update the dbt project component configuration to match the keys generated by the Sling component. Update components/jdbt/defs.yaml with the configuration below:
type: dagster_dbt.DbtProjectComponent

attributes:
  project: "{{ project_root }}/dbt/jdbt"
  translation:
    key: "target/main/{{ node.name }}"
To verify the fix, click Reload definitions in the Dagster UI:
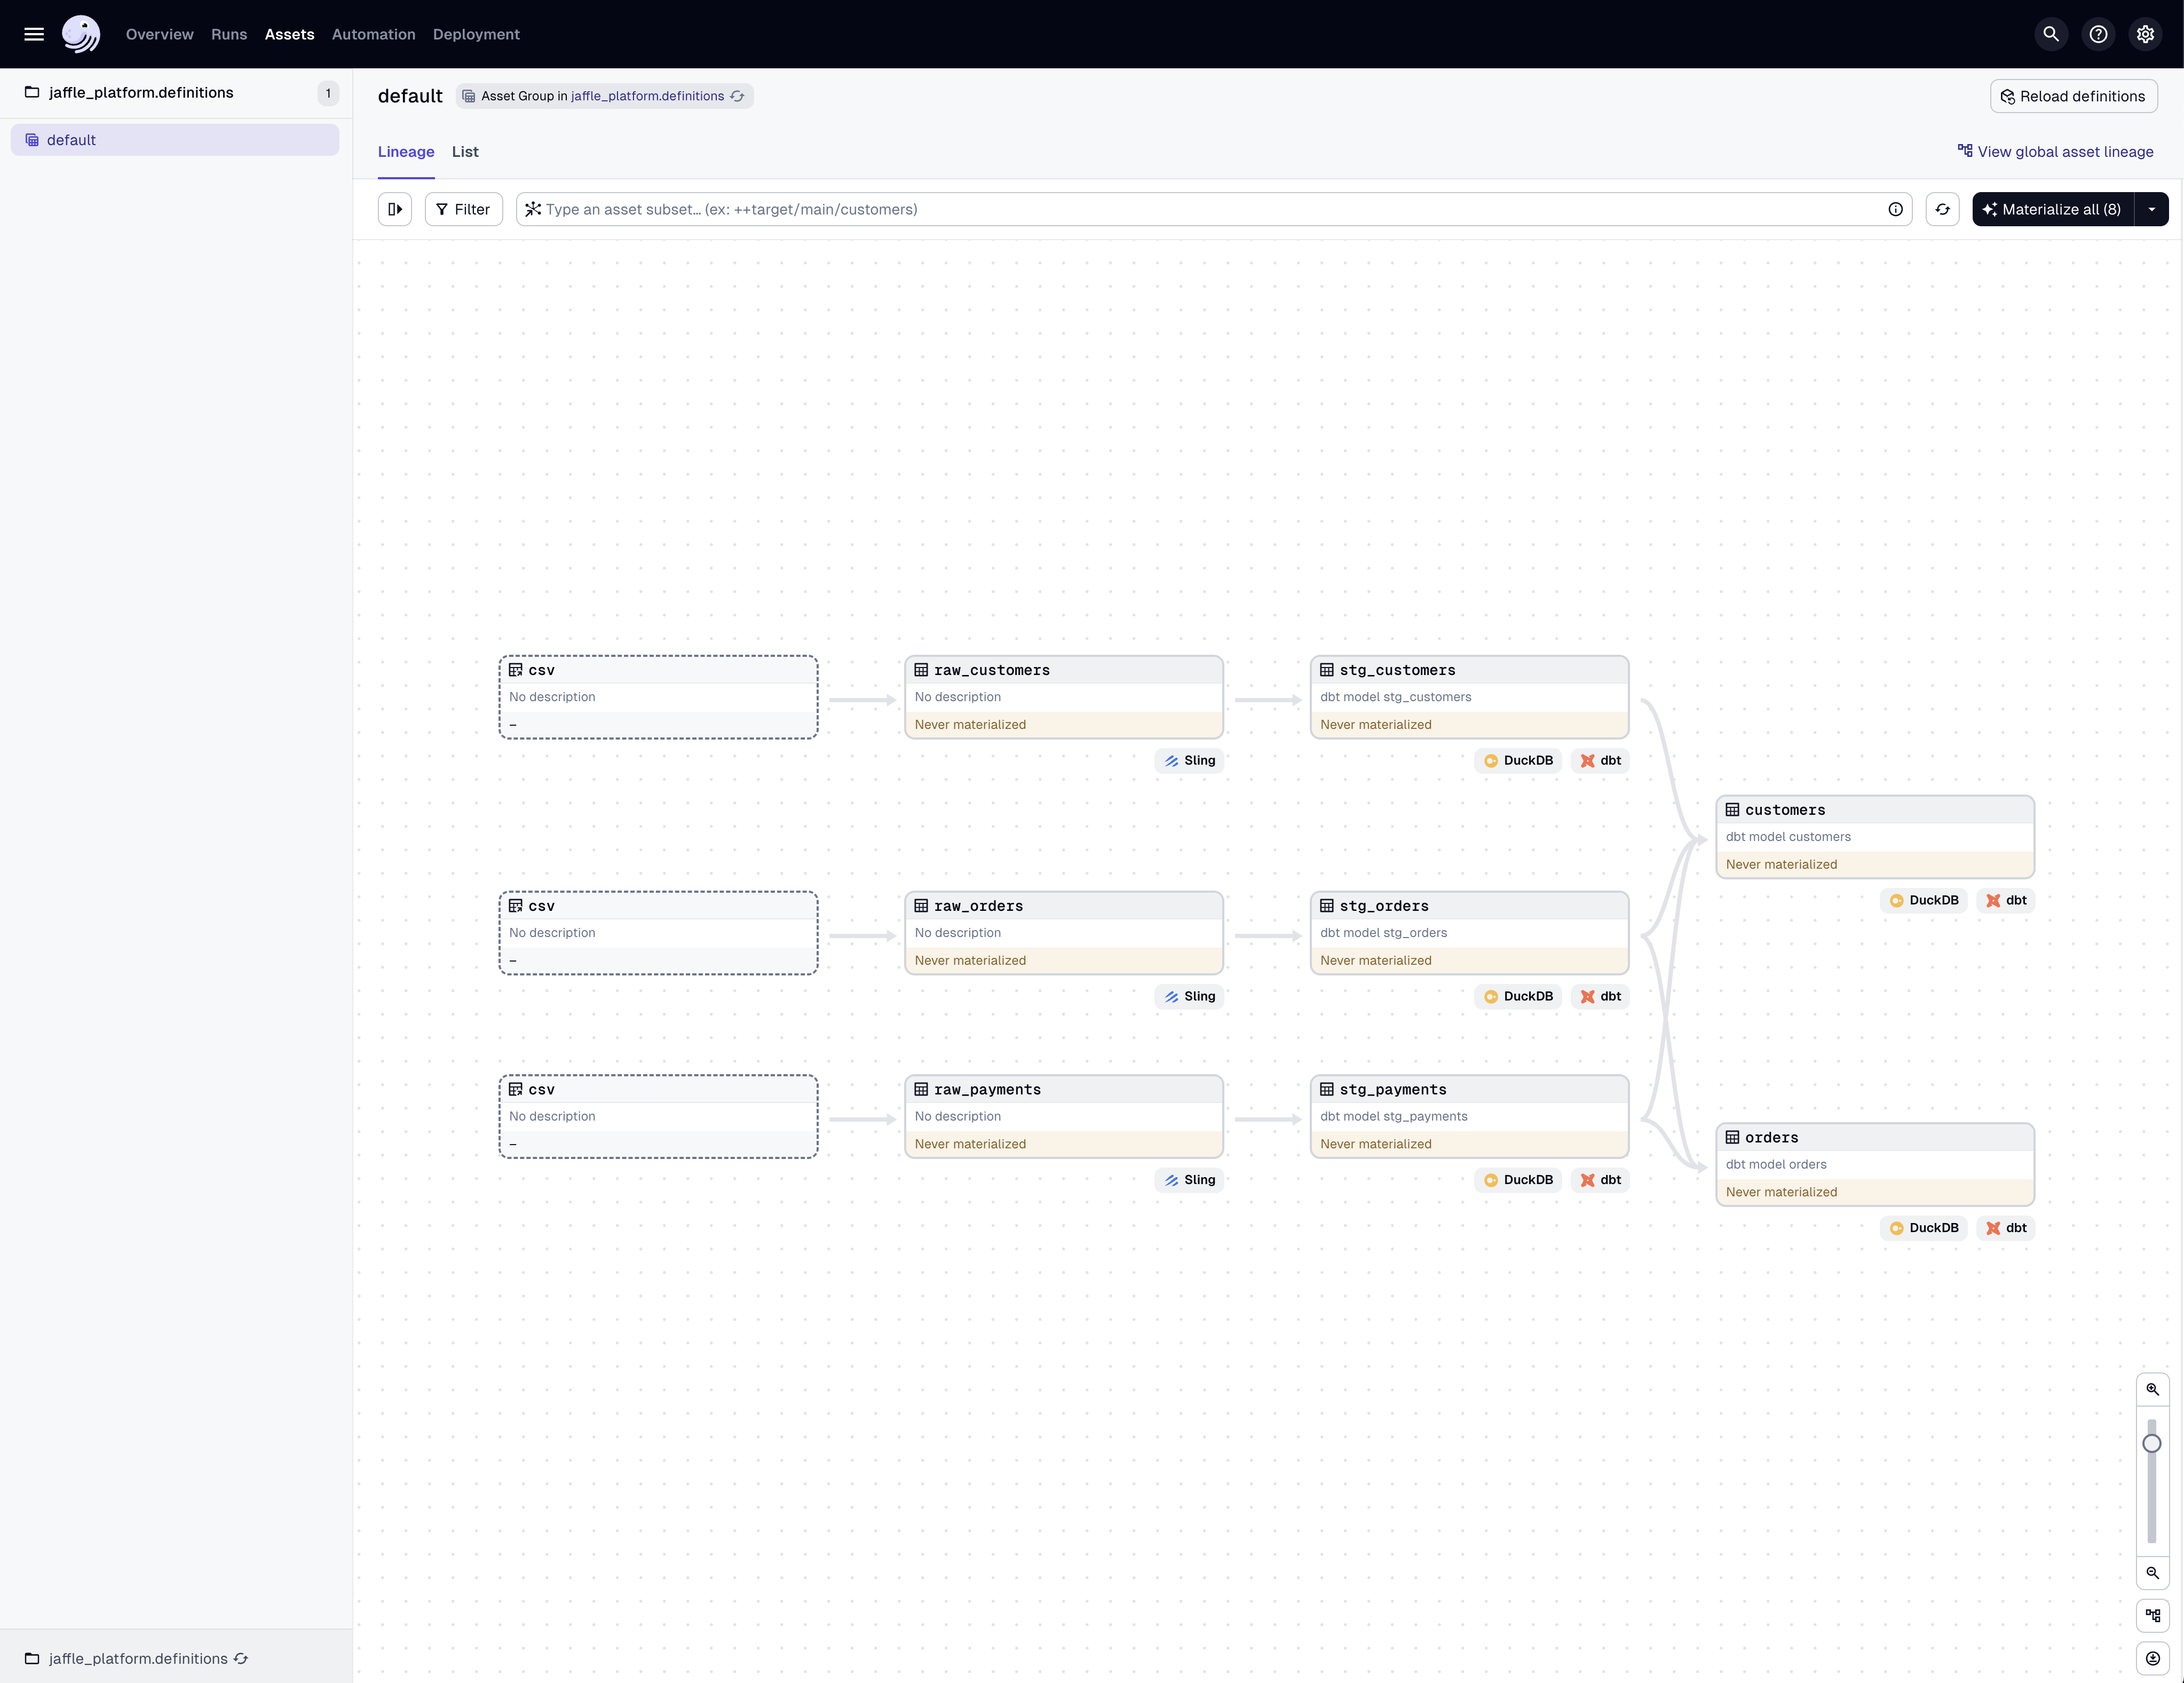
Now the asset keys generated by the Sling and dbt project components match, and the asset graph has the expected assets. To materialize the new assets defined by the dbt project component, click Materialize All.
To further verify the fix, you can view a sample of the newly materialized assets in DuckDB from the command line:
duckdb /tmp/jaffle_platform.duckdb -c "SELECT * FROM orders LIMIT 5;"
┌──────────┬─────────────┬────────────┬───┬───────────────┬──────────────────────┬──────────────────┬────────┐
│ order_id │ customer_id │ order_date │ … │ coupon_amount │ bank_transfer_amount │ gift_card_amount │ amount │
│ int32 │ int32 │ date │ │ double │ double │ double │ double │
├──────────┼─────────────┼────────────┼───┼───────────────┼──────────────────────┼──────────────────┼────────┤
│ 1 │ 1 │ 2018-01-01 │ … │ 0.0 │ 0.0 │ 0.0 │ 10.0 │
│ 2 │ 3 │ 2018-01-02 │ … │ 0.0 │ 0.0 │ 0.0 │ 20.0 │
│ 3 │ 94 │ 2018-01-04 │ … │ 1.0 │ 0.0 │ 0.0 │ 1.0 │
│ 4 │ 50 │ 2018-01-05 │ … │ 25.0 │ 0.0 │ 0.0 │ 25.0 │
│ 5 │ 64 │ 2018-01-05 │ … │ 0.0 │ 17.0 │ 0.0 │ 17.0 │
├──────────┴─────────────┴────────────�┴───┴───────────────┴──────────────────────┴──────────────────┴────────┤
│ 5 rows 9 columns (7 shown) │
└────────────────────────────────────────────────────────────────────────────────────────────────────────────┘
Visualize data
To visualize the data you've just transformed, you can use Evidence.dev, an open-source BI tool.
1. Install the dagster-evidence package
First, install the dagster-evidence package with either uv or pip:
- uv
- pip
uv add dagster-evidence
pip install dagster-evidence
Confirm that the EvidenceProject component type is available by running dg list components:
dg list components
┏━━━━━━━━━━━━━━━━━━━━━━━━━━━━━━━━━━━━━━━━━━━━━━━━━━━┳━━━━━━━━━━━━━━━━━━━━━━━━━━━━━━━━━━━━━━━━━━━━━━━━━━━━━━━━━━━━━━━━━━┓
┃ Key ┃ Summary ┃
┡━━━━━━━━━━━━━━━━━━━━━━━━━━━━━━━━━━━━━━━━━━━━━━━━━━━╇━━━━━━━━━━━━━━━━━━━━━━━━━━━━━━━━━━━━━━━━━━━━━━━━━━━━━━━━━━━━━━━━━━┩
│ dagster.DefinitionsComponent │ An arbitrary set of dagster definitions. │
├────────────────────────────────��───────────────────┼──────────────────────────────────────────────────────────────────┤
│ dagster.DefsFolderComponent │ A folder which may contain multiple submodules, each │
│ │ which define components. │
├───────────────────────────────────────────────────┼──────────────────────────────────────────────────────────────────┤
│ dagster.PipesSubprocessScriptCollectionComponent │ Assets that wrap Python scripts executed with Dagster's │
│ │ PipesSubprocessClient. │
├───────────────────────────────────────────────────┼──────────────────────────────────────────────────────────────────┤
│ dagster_dbt.DbtProjectComponent │ Expose a DBT project to Dagster as a set of assets. │
├───────────────────────────────────────────────────┼──────────────────────────────────────────────────────────────────┤
│ dagster_evidence.EvidenceProject │ Expose an Evidence.dev dashboard as a Dagster asset. │
├───────────────────────────────────────────────────┼──────────────────────────────────────────────────────────────────┤
│ dagster_sling.SlingReplicationCollectionComponent │ Expose one or more Sling replications to Dagster as assets. │
└───────────────────────────────────────────────────┴──────────────────────────────────────────────────────────────────┘
2. Clone the sample Evidence project from GitHub
Clone the example Evidence dashboard project and install the dependencies:
git clone --depth=1 https://github.com/dagster-io/jaffle-dashboard.git jaffle_dashboard && rm -rf jaffle_dashboard/.git
cd jaffle_dashboard && npm install
In this tutorial, we have you clone the Evidence project into your Dagster project. However, you can clone the Evidence project anywhere as long as you set the relative path to the Evidence project correctly in the Evidence component defs.yaml.
3. Scaffold a new instance of the Evidence project component
Use the dg scaffold command to scaffold a new instance of the Evidence project component:
dg scaffold defs dagster_evidence.EvidenceProject jaffle_dashboard
This command will generate an empty YAML file:
type: dagster_evidence.EvidenceProject

attributes: {}
4. Configure the Evidence project component
Next, update the Evidence project component configuration to target the jaffle_dashboard Evidence project, and connect it to the upstream orders and customers assets:
type: dagster_evidence.EvidenceProject

attributes:
  project_path: ../../../../jaffle_dashboard
  asset:
    key: jaffle_dashboard
    deps:
      - target/main/orders
      - target/main/customers
  deploy_command: 'echo "Dashboard built at $EVIDENCE_BUILD_PATH"'
To verify that the YAML is correctly formatted, run dg check yaml:
dg check yaml
All components validated successfully.
To verify that the definitions load successfully, run dg check defs:
dg check defs
All components validated successfully.
All definitions loaded successfully.
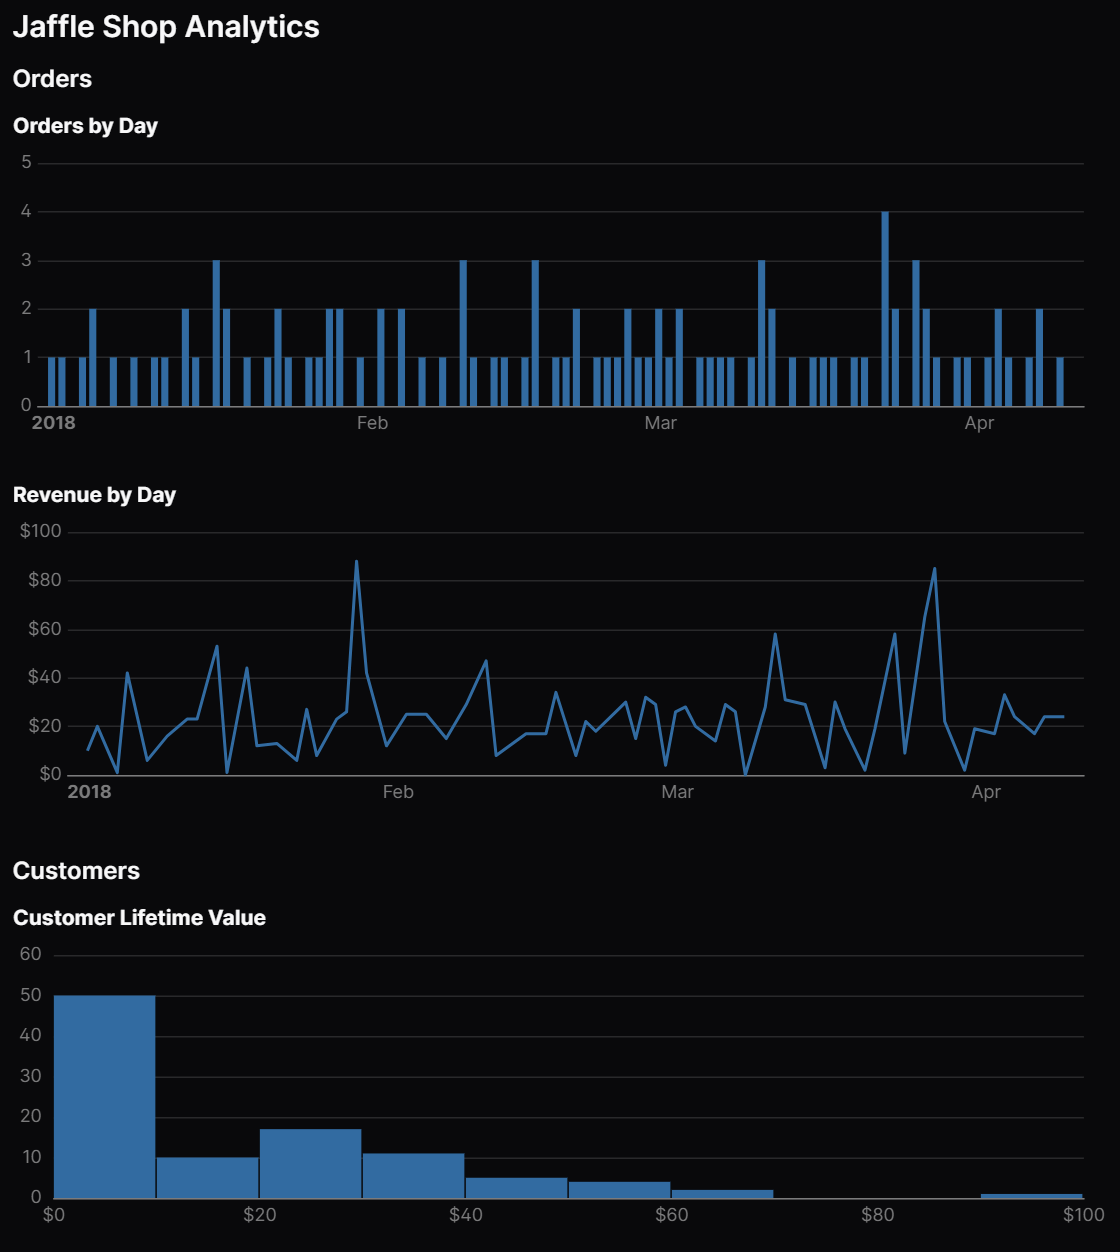
5. Generate and view the Evidence dashboard
To generate a static website for your Evidence dashboard, materialize the jaffle_dashboard asset in the Dagster UI. The website will be created in the jaffle_dashboard/build directory.
To view the dashboard in your browser, run the following commands:
cd jaffle_dashboard/build && python -m http.server
You should see a dashboard like the following at http://localhost:8000/:
Automate your pipeline
Now that you've defined some assets, you can automate them with a schedule.
Make sure you are in the jaffle-platform directory, then scaffold a schedule:
dg scaffold defs dagster.schedule daily_jaffle.py
Next, update the schedule to target all assets with *, and set cron_schedule to @daily:
import dagster as dg


@dg.schedule(cron_schedule="@daily", target="*")
def daily_jaffle(context: dg.ScheduleEvaluationContext):
    return dg.RunRequest()
Finally, verify the schedule was added to your Dagster project with dg list defs:
dg list defs
┏━━━━━━━━━━━┳━━━━━━━━━━━━━━━━━━━━━━━━━━━━━━━━━━━━�━━━━━━━━━━━━━━━━━━━━━━━━━━━━━━━━━━━━━━━━━━━━━━━━━━━━━━━━━━━━━━━━━━━━━━━━━━━━━━━━━━━━━━━━━━━━━━━━━━━━━━━━━━━━━━┓
┃ Section ┃ Definitions ┃
┡━━━━━━━━━━━╇━━━━━━━━━━━━━━━━━━━━━━━━━━━━━━━━━━━━━━━━━━━━━━━━━━━━━━━━━━━━━━━━━━━━━━━━━━━━━━━━━━━━━━━━━━━━━━━━━━━━━━━━━━━━━━━━━━━━━━━━━━━━━━━━━━━━━━━━━━━━━━━━━━┩
│ Assets │ ┏━━━━━━━━━━━━━━━━━━━━━━━━━━━┳━━━━━━━━━┳━━━━━━━━━━━━━━━━━━━━━━━━━━━┳━━━━━━━━┳━━━━━━━━━━━━━━━━━━━━━━━━━━━━━━━━━━━━━━━━━━━━━━━━━━━━━━━━━━━━━━━━━━━┓ │
│ │ ┃ Key ┃ Group ┃ Deps ┃ Kinds ┃ Description ┃ │
│ │ ┡━━━━━━━━━━━━━━━━━━━━━━━━━━━╇━━━━━━━━━╇━━━━━━━━━━━━━━━━━━━━━━━━━━━╇━━━━━━━━╇━━━━━━━━━━━━━━━━━━━━━━━━━━━━━━━━━━━━━━━━━━━━━━━━━━━━━━━━━━━━━━━━━━━┩ │
│ │ │ file___raw_customers/csv │ default │ │ │ │ │
│ │ ├───────────────────────────┼─────────┼───────────────────────────┼────────┼───────────────────────────────────────────────────────────────────┤ │
│ │ │ file___raw_orders/csv │ default │ │ │ │ │
│ │ ├───────────────────────────┼─────────┼───────────────────────────┼────────┼───────────────────────────────────────────────────────────────────┤ │
│ │ │ file___raw_payments/csv │ default │ │ │ │ │
│ │ ├───────────────────────────┼─────────┼───────────────────────────┼────────┼───────────────────────────────────────────────────────────────────┤ │
│ │ │ jaffle_dashboard │ default │ target/main/customers │ │ │ │
│ │ │ │ │ target/main/orders │ │ │ │
│ │ ├───────────────────────────┼─────────┼───────────────────────────┼────────┼───────────────────────────────────────────────────────────────────┤ │
│ │ │ target/main/customers │ default │ target/main/stg_customers │ dbt │ dbt model customers │ │
│ │ │ │ │ target/main/stg_orders │ duckdb │ │ │
│ │ │ │ │ target/main/stg_payments │ │ #### Raw SQL: │ │
│ │ │ │ │ │ │ ```sql │ │
│ │ │ │ │ │ │ with customers as ( │ │
│ │ │ │ │ │ │ │ │
│ │ │ │ │ │ │ select * from {{ ref('stg_cust… │ │
│ │ ├───────────────────────────┼─────────┼───────────────────────────┼────────┼───────────────────────────────────────────────────────────────────┤ │
│ │ │ target/main/orders │ default │ target/main/stg_orders │ dbt │ dbt model orders │ │
│ │ │ │ │ target/main/stg_payments │ duckdb │ │ │
│ │ │ │ │ │ │ #### Raw SQL: │ │
│ │ │ │ │ │ │ ```sql │ │
│ │ │ │ │ │ │ {% set payment_methods = ['credit_card', 'coupon', 'bank_tra… │ │
│ │ ├───────────────────────────┼─────────┼───────────────────────────┼────────┼───────��────────────────────────────────────────────────────────────┤ │
│ │ │ target/main/raw_customers │ default │ file___raw_customers/csv │ sling │ │ │
│ │ ├───────────────────────────┼─────────┼───────────────────────────┼────────┼───────────────────────────────────────────────────────────────────┤ │
│ │ │ target/main/raw_orders │ default │ file___raw_orders/csv │ sling │ │ │
│ │ ├───────────────────────────┼─────────┼───────────────────────────┼────────┼───────────────────────────────────────────────────────────────────┤ │
│ │ │ target/main/raw_payments │ default │ file___raw_payments/csv │ sling │ │ │
│ │ ├───────────────────────────┼─────────┼───────────────────────────┼────────┼───────────────────────────────────────────────────────────────────┤ │
│ │ │ target/main/stg_customers │ default │ target/main/raw_customers │ dbt │ dbt model stg_customers │ │
│ │ │ │ │ │ duckdb │ │ │
│ │ │ │ │ │ │ #### Raw SQL: │ │
│ │ │ │ │ │ │ ```sql │ │
│ │ │ │ │ │ │ with source as ( │ │
│ │ �│ │ │ │ │ │ │
│ │ │ │ │ │ │ {#- │ │
│ │ │ │ │ │ │ Normally we would … │ │
│ │ ├───────────────────────────┼─────────┼───────────────────────────┼────────┼───────────────────────────────────────────────────────────────────┤ │
│ │ │ target/main/stg_orders │ default │ target/main/raw_orders │ dbt │ dbt model stg_orders │ │
│ │ │ │ │ │ duckdb │ │ │
│ │ │ │ │ │ │ #### Raw SQL: │ │
│ │ │ │ │ │ │ ```sql │ │
│ │ │ │ │ │ │ with source as ( │ │
│ │ │ │ │ │ │ │ │
│ │ │ │ │ │ │ {#- │ │
│ │ │ │ │ │ │ Normally we would sel… │ │
│ │ ├───────────────────────────┼─────────┼───────────────────────────┼────────┼───────────────────────────────────────────────────────────────────┤ │
│ │ │ target/main/stg_payments │ default │ target/main/raw_payments │ dbt │ dbt model stg_payments │ │
│ │ │ │ │ │ duckdb │ │ │
│ │ │ │ │ │ │ #### Raw SQL: │ │
│ │ │ │ │ │ │ ```sql │ │
│ │ │ │ │ │ │ with source as ( │ │
│ │ │ │ │ │ │ │ │
│ │ │ │ │ │ │ {#- │ │
│ │ │ │ │ │ │ Normally we wou… │ │
│ │ └───────────────────────────┴─────────┴───────────────────────────┴────────┴───────────────────────────────────────────────────────────────────┘ │
│ Schedules │ ┏━━━━━━━━━━━━━━┳━━━━━━━━━━━━━━━┓ │
│ │ ┃ Name ┃ Cron schedule ┃ │
│ │ ┡━━━━━━━━━━━━━━╇━━━━━━━━━━━━━━━┩ │
│ │ │ daily_jaffle │ @daily │ │
│ │ └──────────────┴───────────────┘ │
└───────────┴──────────────────────────────────────────────────────────────────────────────────────────────────────────────────────────────────────────────────┘
Next steps
To continue your journey with components, you can add more components to your project or learn how to manage multiple components-ready projects with dg.